기본 설정 확인


show variables like 'c%';


MariaDB 설정 변경


vi /etc/mysql/my.cnf


[client]

default-character-set=utf8mb4


[mysql]

default-character-set=utf8mb4


[mysqld]

collation-server = utf8mb4_unicode_ci

#init-connect='SET NAMES utf8mb4'

character-set-server = utf8mb4


[mysqldump]

default-character-set=utf8mb4


변경된 설정 확인


show variables like 'c%';


Posted by theqoo
,

Ubuntu 16.04.6 LTS


MariaDB 10.4 [Stable]


sudo -s

apt-get install software-properties-common

apt-key adv --recv-keys --keyserver hkp://keyserver.ubuntu.com:80 0xF1656F24C74CD1D8

add-apt-repository 'deb [arch=amd64,arm64,i386,ppc64el] http://nyc2.mirrors.digitalocean.com/mariadb/repo/10.4/ubuntu xenial main'


sudo apt update

sudo apt install mariadb-server


https://downloads.mariadb.org/mariadb/repositories/#mirror=digitalocean-nyc


'Study > Ubuntu' 카테고리의 다른 글

AWS CLI 설치 및 삭제  (0) 2019.09.01
Ubuntu node.js v12.x 설치  (0) 2019.06.03
Ubuntu MongoDB 설치  (0) 2019.06.02
Ubuntu node.js v10.x 설치  (0) 2019.06.02
Ubuntu - 디스크 정보 확인  (0) 2015.08.13
Posted by theqoo
,

사전에 python, unzip 이 설치되어있어야 합니다.


AWS CLI를 ~/.local/lib/aws 에 설치하고 ~/bin/aws에 심볼 링크를 생성


curl "https://s3.amazonaws.com/aws-cli/awscli-bundle.zip" -o "awscli-bundle.zip"

unzip awscli-bundle.zip

./awscli-bundle/install -b ~/bin/aws


PATH 환경 변수 설정


echo $PATH | grep ~/bin

export PATH=~/bin:$PATH


AWS CLI 삭제


sudo rm -rf /usr/local/aws

sudo rm /usr/local/bin/aws


'Study > Ubuntu' 카테고리의 다른 글

Ubuntu MariaDB 설치  (0) 2020.01.07
Ubuntu node.js v12.x 설치  (0) 2019.06.03
Ubuntu MongoDB 설치  (0) 2019.06.02
Ubuntu node.js v10.x 설치  (0) 2019.06.02
Ubuntu - 디스크 정보 확인  (0) 2015.08.13
Posted by theqoo
,

WinBox v6.43.8 on RB750GL


IP 할당 정보 확인


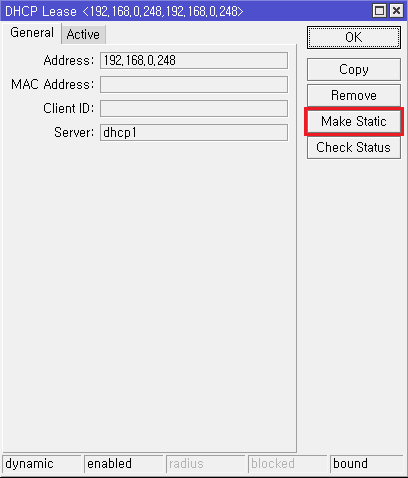
IP -> DHCP Server -> Leases


D = Dynamic

Static으로 변경할 Client Double click


Make Static click -> OK click

다시 변경할 Client Double click


General -> Address 에 Static IP 설정 -> OK


Windows


ipconfig/release

ipconfig/renew


'Study > Network' 카테고리의 다른 글

CCNA 200-120 eigrp config  (0) 2015.05.09
Posted by theqoo
,

Ubuntu 16.04.4 LTS [Amazon Lightsail]


NodeSource 사용

curl -sL https://deb.nodesource.com/setup_12.x | sudo -E bash -
sudo apt-get install -y nodejs


https://github.com/nodesource/distributions


'Study > Ubuntu' 카테고리의 다른 글

Ubuntu MariaDB 설치  (0) 2020.01.07
AWS CLI 설치 및 삭제  (0) 2019.09.01
Ubuntu MongoDB 설치  (0) 2019.06.02
Ubuntu node.js v10.x 설치  (0) 2019.06.02
Ubuntu - 디스크 정보 확인  (0) 2015.08.13
Posted by theqoo
,

Ubuntu 16.04.4 LTS [Amazon Lightsail]

sudo apt-key adv --keyserver hkp://keyserver.ubuntu.com:80 --recv 9DA31620334BD75D9DCB49F368818C72E52529D4

echo "deb [ arch=amd64,arm64 ] https://repo.mongodb.org/apt/ubuntu xenial/mongodb-org/4.0 multiverse" | sudo tee /etc/apt/sources.list.d/mongodb-org-4.0.list

sudo apt-get update

sudo apt-get install -y mongodb-org

echo "mongodb-org hold" | sudo dpkg --set-selections
echo "mongodb-org-server hold" | sudo dpkg --set-selections
echo "mongodb-org-shell hold" | sudo dpkg --set-selections
echo "mongodb-org-mongos hold" | sudo dpkg --set-selections
echo "mongodb-org-tools hold" | sudo dpkg --set-selections

sudo service mongod start

mongod --version

'Study > Ubuntu' 카테고리의 다른 글

AWS CLI 설치 및 삭제  (0) 2019.09.01
Ubuntu node.js v12.x 설치  (0) 2019.06.03
Ubuntu node.js v10.x 설치  (0) 2019.06.02
Ubuntu - 디스크 정보 확인  (0) 2015.08.13
https 보안서버 구축 (SSL 사설 인증서 설치)  (0) 2015.05.27
Posted by theqoo
,

Ubuntu 16.04.4 LTS [Amazon Lightsail]


wget https://nodejs.org/dist/v10.16.0/node-v10.16.0-linux-x64.tar.xz


VERSION=v10.16.0
DISTRO=linux-x64
sudo mkdir -p /usr/local/lib/nodejs
sudo tar -xJvf node-$VERSION-$DISTRO.tar.xz -C /usr/local/lib/nodejs


vi .profile

# Nodejs

VERSION=v10.16.0

DISTRO=linux-x64

export PATH=/usr/local/lib/nodejs/node-$VERSION-$DISTRO/bin:$PATH


. ~/.profile


node -v

'Study > Ubuntu' 카테고리의 다른 글

Ubuntu node.js v12.x 설치  (0) 2019.06.03
Ubuntu MongoDB 설치  (0) 2019.06.02
Ubuntu - 디스크 정보 확인  (0) 2015.08.13
https 보안서버 구축 (SSL 사설 인증서 설치)  (0) 2015.05.27
Ubuntu - nginx에 phpmyadmin 설정  (1) 2013.04.01
Posted by theqoo
,

운영 체제 요구 사항


Windows 10 Enterprise

Windows 10 Professional

Windows 10 Education


하드웨어 요구 사항


두 번째 수준 주소 변환(SLAT)을 사용하는 64비트 프로세서

VM 모니터 모드 확장(Intel CPU의 VT-C)을 지원하는 CPU

충분한 메모리


하드웨어 호환성 확인


PowerShell 또는 명령 프롬프트(cmd.exe)를 열고 systeminfo.exe를 입력

나열된 모든 Hyper-V 요구 사항의 값이 예인 경우 시스템에서 Hyper-V 역할을 실행할 수 있습니다.


https://msdn.microsoft.com/ko-kr/virtualization/hyperv_on_windows/quick_start/walkthrough_compatibility

'Study > Windows' 카테고리의 다른 글

윈도우 공인인증서 위치  (0) 2015.05.26
Windows 8과 8.1 WOL(Wake on LAN) 동작  (0) 2015.05.09
Posted by theqoo
,

다른 툴을 설치하여도 가능하지만 lsblk 명령어로도 확인이 가능하다.


root@ubuntu-web:~# lsblk -io KNAME,TYPE,SIZE,MODEL


가장머신은 Virtual Disk로 나옵니다....


'Study > Ubuntu' 카테고리의 다른 글

Ubuntu MongoDB 설치  (0) 2019.06.02
Ubuntu node.js v10.x 설치  (0) 2019.06.02
https 보안서버 구축 (SSL 사설 인증서 설치)  (0) 2015.05.27
Ubuntu - nginx에 phpmyadmin 설정  (1) 2013.04.01
Ubuntu - MariaDB 설치  (0) 2013.03.24
Posted by theqoo
,


1. mod_ssl 설치

yum install mod_ssl

2. Generate perivate key 생성

openssl genrsa -des3 -out ca.key 2048
// 패스워드 입력


3. Generate CSR 생성

openssl req -new -key ca.key out ca.csr


// 정보 입력
Country Name (2 letter code) [] :
State or Province Name (full name) [] :
Locality Name (eg, city) [Default City] :
Organization Name (eg, company) [Default Company Ltd]:
Organizational Unit Name (eg, section) []:
Common Name (eg, your name or your server's hostname) []:
Email Address []:

A challenge password []: 생략
An optional company name []: 생략

4. Generate Self Signed Key 생성

openssl x509 -req -days 365 -in ca.csr -signkey ca.key -out ca.crt

5. /etc/httpd/conf.d/ssl.conf 수정

SSLCertificateKeyFile "/apache/conf/ssl/ca.key"
SSLCertificateFile "/apache/conf/ssl/ca.crt"

6. httpd 재시작

/etc/init.d/httpd restart


웹 브라우저의 보안이 강화되면서 사설 인증서를 거부하는 경우도 있습니다.
테스트 용도가 아니라면, StartSSL에서 무료로 발급하는 인증서를 사용하는것을 권장합니다.


'Study > Ubuntu' 카테고리의 다른 글

Ubuntu node.js v10.x 설치  (0) 2019.06.02
Ubuntu - 디스크 정보 확인  (0) 2015.08.13
Ubuntu - nginx에 phpmyadmin 설정  (1) 2013.04.01
Ubuntu - MariaDB 설치  (0) 2013.03.24
Ubuntu - nginx 컴파일 설치  (0) 2013.03.22
Posted by theqoo
,